The administrator’s manual covers the package installation, maintenance and configuration of a mini-buildd instance.
mini-buildd 1.0 will be available natively in Debian from jessie upwards.
You may also check mini-buildd’s home for apt-lines for other (Debian or Ubuntu) base distributions and snapshot versions.
To install a mini-buildd instance, just install the Debian package:
# apt-get install mini-buildd
Package configuration (via debconf) include the home path of the mini-buildd user, the administrator’s password and extra options for the daemon run.
Usually, you set the admin password on the initial install, and just leave the rest on default values.
Of course, you can change your settings anytime (including (re-)setting the admin password and changing mini-buildd’s home path) using:
# dpkg-reconfigure mini-buildd
Note
Be sure you have enough space on mini-buildd’s home path (per default /var/lib/mini-buildd) to hold all the repositories (open end, the more the better) and/or chroots. For the latter, as a rule of thumb, you will need about:
(BASE_DISTS * ARCHS * 0.3G) + (CORES * 4G)
disk space free for building.
mini-buildd relies on having a user called mini-buildd; the Unix home of this user is the home of your mini-buildd instance, and the Unix daemon runs with its user id.
In mini-buildd’s home, you will find this top level layout; i.e., these are handled by mini-buildd itself, and should not be touched manually (unless you really know what you are doing, of course):
config.sqlite       mini-buildd's configuration.
incoming/           Directory served by the ftpd.
var/                Variable data: chroots, logs, temp directories, build directories spool.
repositories/       Your valuable repositories.
.gnupg/             The instance's GnuPG key ring.
.mini-buildd.pid    Unix daemon PID file.
.django_secret_key  Some django shit we need.
When you remove the mini-buildd package without purging, it will remove system artifacts (see --remove-system-artifacts option, this currently affects chroots only) that can only be properly removed with mini-buildd installed. Otherwise, mini-buildd’s home (and, of course, the repositories) stay intact.
When you purge the mini-buildd package, all traces will be removed from the system, including your repositories.
Per default, mini-buildd logs
The former is handled by mini-buildd itself, including rotating and access to it via API calls.
The latter is the same place where sbuild and friends put their logs by default.
You may control the log level via the --verbose, and extra debug options via the --debug command line flag.
Just set these options by dpkg-reconfiguring mini-buildd; more details on the usage via mini-buildd --help.
You can view mini-buildd’s log via the API call logcat:
$ mini-buildd-tool --host=my.ho.st:8066 logcat
Mini-buildd also keeps a standard HTTP access log in ~/var/log/access.log.
When mini-buildd runs, it’s basically acts as a web server, with a django web application running on it.
mini-buildd’s configuration consists of related django model instances, and their configuration is done via Django’s ‘admin’ application. On the mini-buildd home page, just hit on Configuration (left top) to enter.
You will need to log in as Django user admin, with the password you configured when installing the package (if you chose an insecure password on package install time, now is the time to set a proper one via Django’s user management).
All changes you do here finally wind up in the SQL database at ~/config.sqlite; this config not only represents mere configuration, but also state (of ~mini-buildd/, and in case of chroots, even artifacts on the system, see Model statuses below), so this file cannot be simply interchanged or copied.
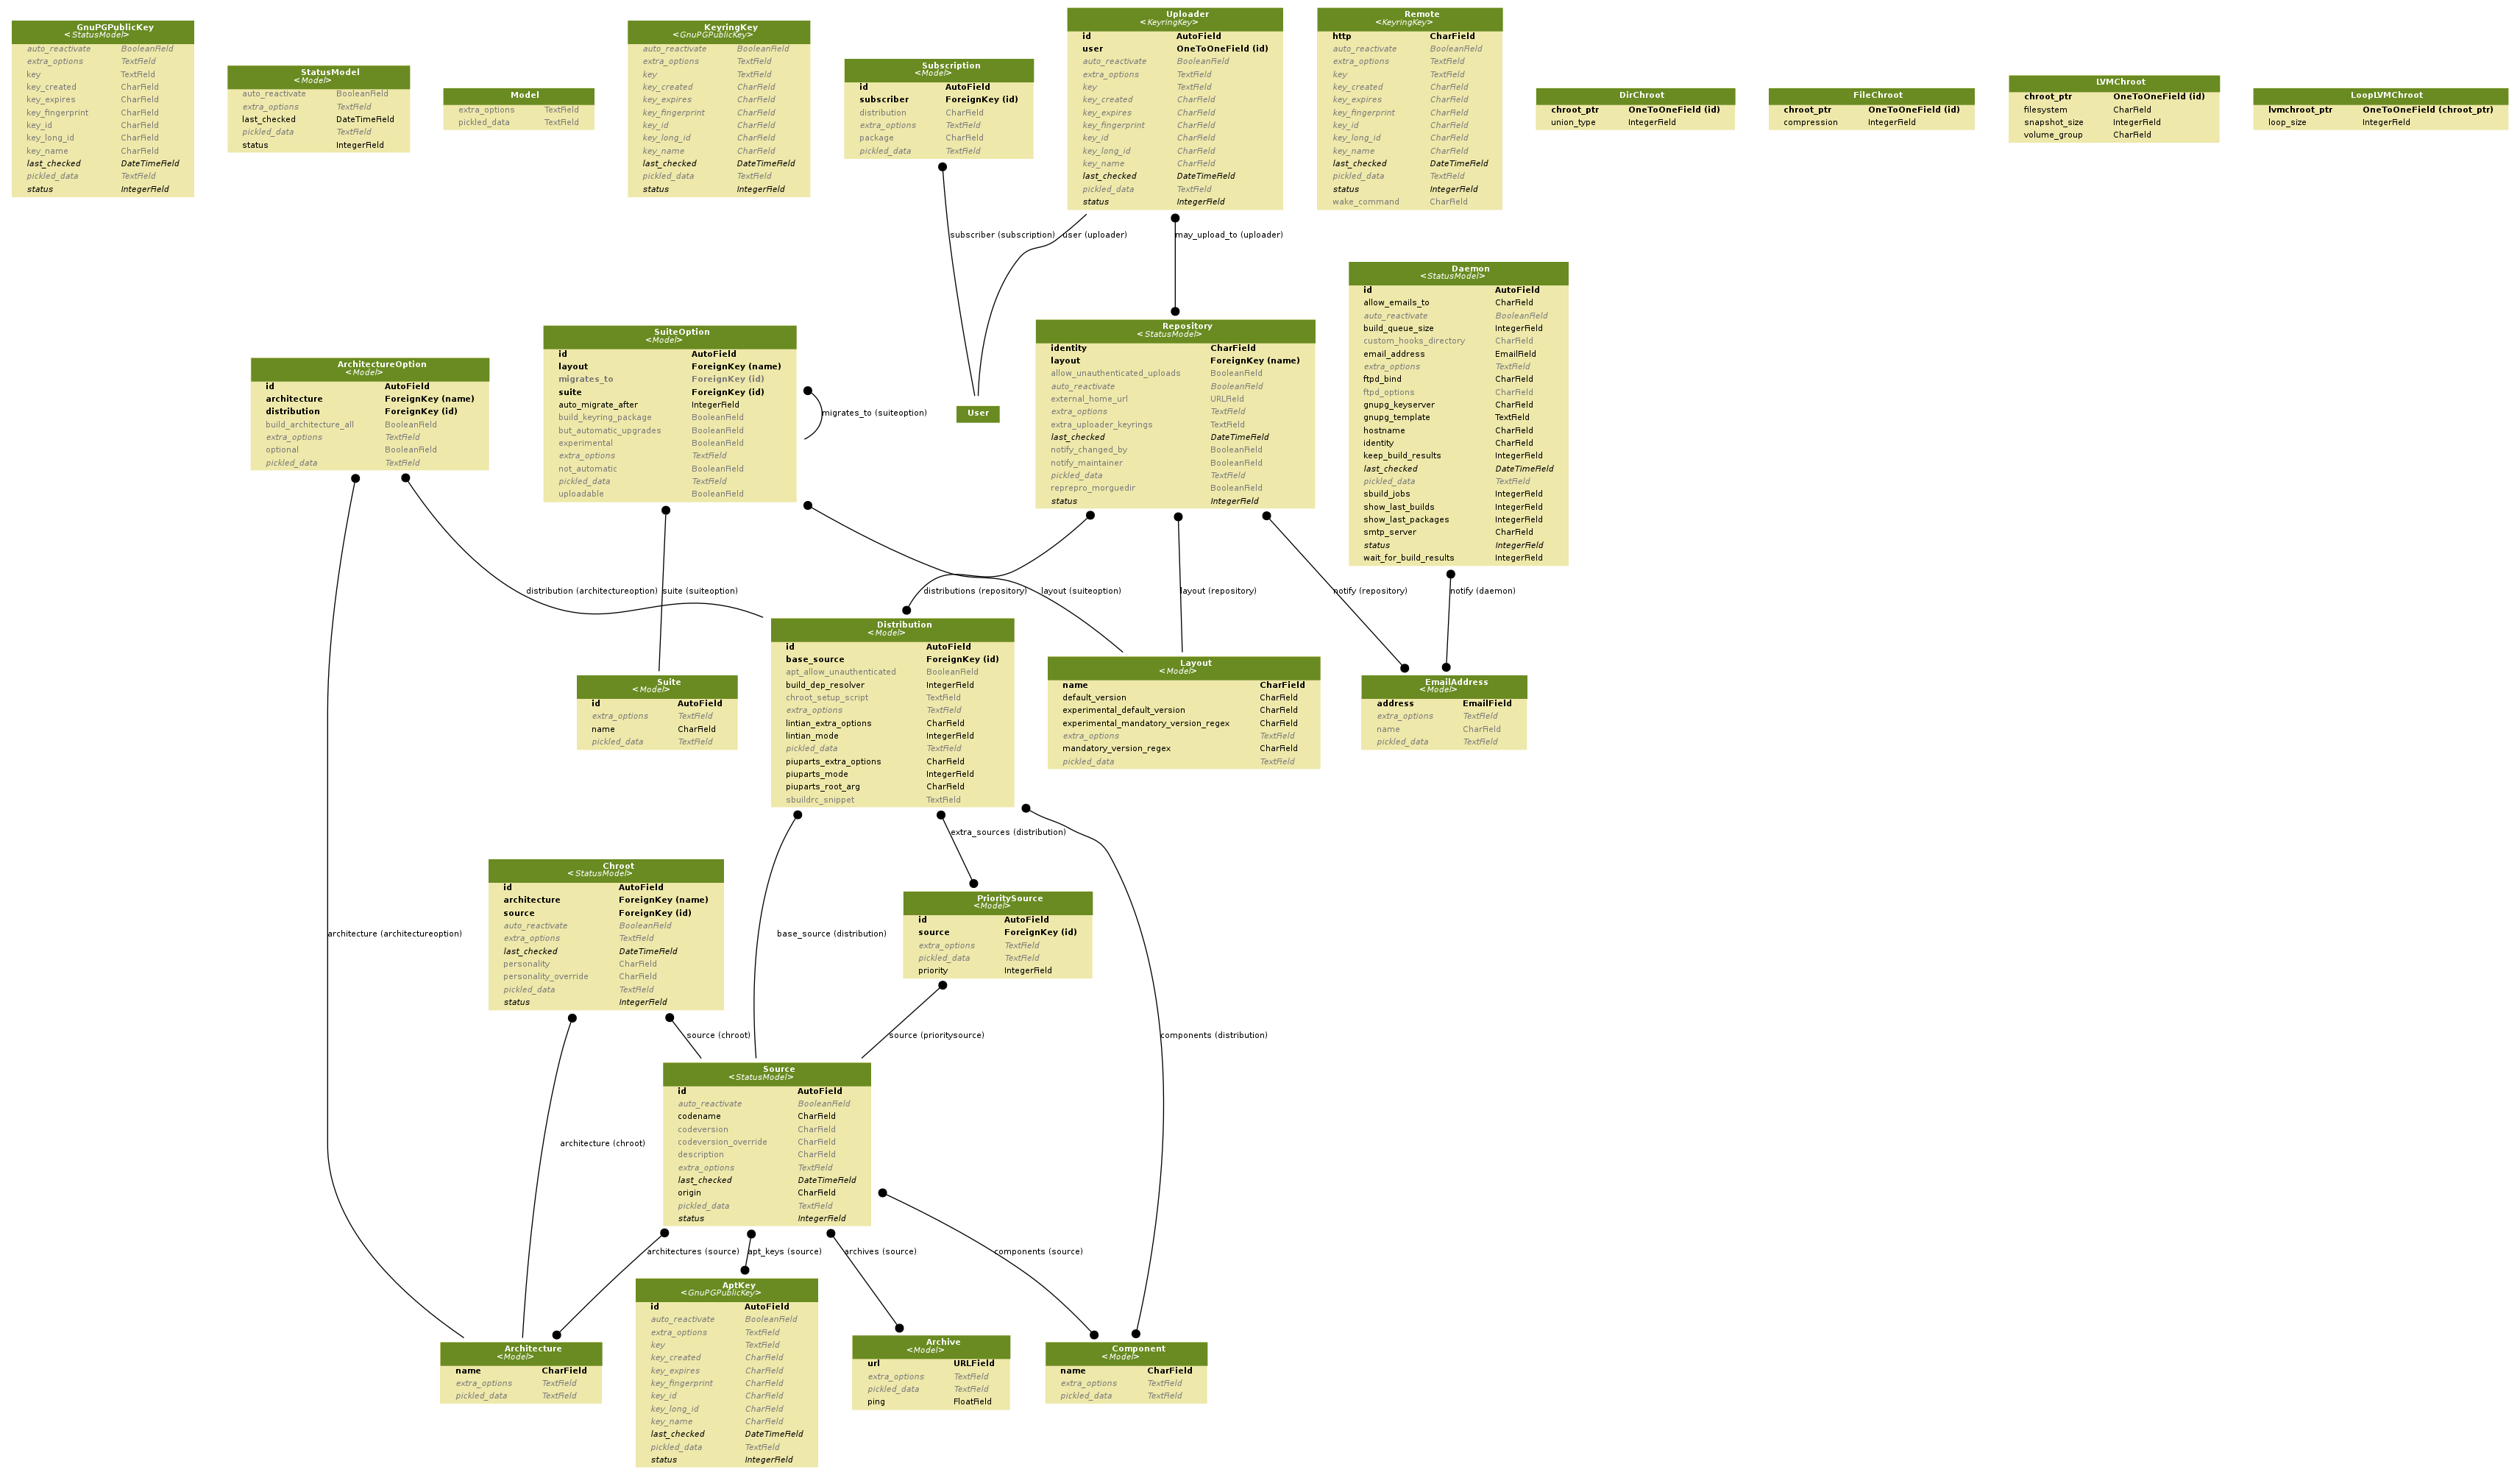
As appetizer, have a look at this models overview.
Some of the models have a status attached to it.
This usually refers to a model’s associated data on the system (which can be managed via actions in the configuration interface):
| Model | Associated prepared system data | File location (~ denoting mini-buildd’s home path) |
|---|---|---|
| Daemon | GnuPG Key | ~/.gnupg/ |
| Repository | Reprepro repository | ~/repositories/REPO_ID/ |
| Chroot | Chroot data and schroot configuration |
|
Some other models also use the same status infrastructure, but the associated data is prepared internally in the model’s data (SQL database) only:
| Model | Associated prepared data |
|---|---|
| AptKey, Uploader, Remote | Public GnuPG Key |
| Source | List of matching archives, selected info from Release file |
| Status | Check status | Semantic |
|---|---|---|
| Removed | No associated data. | |
| Prepared | Associated data exists. With no flags, data is checked and in-sync. Special conditions to the data may apply: | |
| Prepared | Unchecked (-) | Needs a manual check run to set things straight. |
| Prepared | Changed (*) | Model was changed, but the date is not yet updated. Needs a manual prepare run to set things straight. |
| Prepared | Failed (x) | Check failed. |
| Prepared | Failed_Reactivate (A) | Check failed, will be automatically activated again as soon as check succeeds again. |
| Active | Prepared on the system, checked and activated. |
Status actions can be called from a model’s list view in Django’s admin configuration.
| Action | Semantic |
|---|---|
| Prepare | Create associated data on the system, or synchronize it with item changes. |
| Check | Check item and/or associated data. |
| Activate | Activate the item, or set the auto-activate flag. |
| Deactivate | Deactivate the item, or remove the auto-activate flag. |
| Remove | Remove associated data from system. |
The Daemon model represents a configured mini-buildd instance. It is limited to have exactly one instance; when activated, it means the internal FTP server is started acting on *.changes.
Don’t confuse this with the mini-buildd Unix daemon, which is always running when the mini-buildd Debian package is installed, and always provides the HTTP server and web application.
The Daemon instance inside of mini-buildd provides the packager and builder engine (triggered by incoming via the FTP server), and can be enabled/disabled inside mini-buildd.
Todo
FAQ: Daemon prepare does not finish.
Increase entropy on the system, either using the physical mouse, keyboard, etc, or alternatively by installing haveged:
# apt-get install haveged
This groups all models that determine what APT sources are available, and where to get them.
You will later interface with Source and PrioritySource when dealing with chroots and distributions.
A Source is usually identified sufficiently by Origin and Codename.
Todo
FAQ: Can’t prepare a source as key verification always fails.
You must add all keys the Release file is signed with.
To make absolutely sure, manually run s.th. like:
$ gpg --verify /var/lib/apt/lists/PATH_Release.gpg /var/lib/apt/lists/PATH_Release
for the Release in question to get a list of key ids the source is actually signed with.
It’s highly recommended to just stick with one of the default Layouts, as produced by the Defaults wizard.
In case you really need a custom layout, it’s recommended not to change the Default Layouts, but to create a new Layout profile with an appropriate name.
The Default Layout’s semantics are outlined in User’s Manual.
The Debian Developers Layout is meant for mimicking a layout like in Debian unstable (no version restriction, upload to meta a distribution names like unstable) to test build packages meant for Debian.
You will interface with Layouts in Repositories, determining what suites (and rollback distributions) are available, which suites are uploadable, and which suites migrate, etc...
Distributions determines how and for what architectures a base distribution is to be build:
Todo
BUG: eatmydata: Builds fail when linked with openvc
Only a problem in current (Jan 2014) sid. See [6].
A repository represents one apt repository managed via reprepro:
Uploader instances are created automatically to each user profile. The administrator may activate GPG keys a user has uploaded, and decide what repositories he is allowed to upload.
Adding (active) chroots to your mini-buildd instance implicitly makes it a builder.
Preparing a chroots will both bootstrap it, and create configuration on the system so it can be used via schroot.
You can chose amongst a number of schroot backends; to be able to be supported by mini-buildd, the backend must support snapshots (compare man 5 schroot.conf).
At the time (Jan 2015) of this writing, mini-buildd supports these backends:
| Type | Options | Build size limit | Speed | Extra fs | Extra dependencies | |
|---|---|---|---|---|---|---|
| Dir | aufs, overlayfs, unionfs, overlay | No | Medium | No | Kernel support (aufs <= jessie, overlay >= stretch) | Recommended |
| File | compression | No | Low | No | No | |
| LVM | loop, given LVM setup | Yes | Fast | Yes | LVM tools, Kernel support (dm, in Debian standard kernel) |
In short, we recommend directory based chroots via aufs using 3.2.35 =< Debian Linux Kernel < 3.18 (jessie-) and recommend directory based chroots via overlay with kernels > 3.18 (stretch+) as best compromise. It offers acceptable speed, and no limits.
File chroots are also fine, they will just always work; you may think about configuring schroot to use a tmpfs for its snapshots (if you have enough RAM), and use no compression to speed it up.
If you are in for speed, or just already have a LVM setup on your system, LVM chroots are good alternative, too.
Note
You may configure Distributions with generic build options that may also affect the backend (like pre-installing eatmydata) or build (like configuring ccache to be used) speed. See Distributions and Repositories.
Todo
BUG: For some distributions, schroot doesn’t work with systemd (/dev/shm).
See this [1] schroot bug for more information.
mini-buildd comes with a crude temporary workaround, see (and please read the comments in) /usr/share/doc/mini-buildd/examples/09bug728096shmfixer. Just symlink in schroot’s setup.d:
# cd /etc/schroot/setup.d
# ln -s /usr/share/doc/mini-buildd/examples/09bug728096shmfixer .
to enable.
Todo
FAQ: How to use foreign-architecture chroots with qemu.
Tested with ‘armel’ (other architectures might work as well, but not tested).
Install these additional packages:
# apt-get install binfmt-support qemu-user-static
You will need a version of qemu-user-static with [2] fixed.
In the Chroot configuration, add a line:
Debootstrap-Command: /usr/sbin/qemu-debootstrap
to the extra options. That’s it. Now just prepare && activate as usual.
Todo
BUG: debootstrap fails for <=lenny chroots on >=jessie host kernel (uname).
See [3]. This should ideally be worked around in debootstrap itself eventually.
mini-buildd comes with a workaround wrapper /usr/sbin/mbd-debootstrap-uname-2.6. Just add:
Debootstrap-Command: /usr/sbin/mbd-debootstrap-uname-2.6
to the chroot’s extra options to work around it (the default chroots created with the chroot wizard already include this workaround for lenny and etch chroots, btw).
Fwiw, this is due to older libc6 packaging’s preinst, which will meekly fail if uname -r starts with a two-digit version; i.e.:
FINE : 3.2.0-4-amd64      Standard wheezy kernel
FAILS: 3.10-2-amd64       Standard jessie/sid kernel
FAILS: 3.9-0.bpo.1-amd64  Wheezy backport of the jessie/sid kernel
Todo
BUG: Fails to build “all” packages with “build archall” flag set to arch “x” in case DSP has >= 1 arch “all” and >=1 arch “y” binary package
This is due to sbuild and in in more detail explained here [4].
A bad one-package workaround would be to change the “build archall” flag to arch “y”.
Todo
BUG: LVM chroots fail running lvcreate with ‘not found: device not cleared’
Unclear (?). See [5] or http://lists.debian.org/debian-user/2012/12/msg00407.html .
“–noudevsync” workaround makes lvcreate work again, but the chroot will not work later anyway later.
Todo
FAQ: Chroot creating fails due to missing arch in archive (partial mirror).
This might occur, for example, if you use a (local) partial mirror (with debmirror or the like) as mini-buildd archive that does not mirror the arch in question.
At the moment, all archives you add must provide all architectures you are going to support to avoid problems.
Todo
FAQ: sudo fails with “sudo: no tty present and no askpass program specified”.
Make sure /etc/sudoers has this line:
#includedir /etc/sudoers.d
(This is sudo’s Debian package’s default, but the administrator might have changed it at some point.)
Remotes can interconnect a mini-buildd instance with another in a peer-to-peer fashion, i.e., you need to add a respective remote instance on both two peers. When interconnected, these two instances automatically share their build chroots.
To interconnect two mini-buildd instances
Note
Be sure to use the exact same host names as given in the resp. instance’s Daemon configuration!
On mini-buildd’s home, you will find action buttons to create+build keyring packages, as well as running test packages.
Upgrade the Debian packages from 0.8.x to 1.0.
You will then have 1.0 up and running, and ye olde 0.8.x repositories still available as read-only apt repositories.
Just be sure you don’t purge the old package, and then install 1.0, as this will remove the whole old repository.
Configure mini-buildd 1.0.
This means you should, in the end, have a 1.0 repository with the same identity as the old 0.8.x repository, and with all distributions you want to migrate.
Import packages.
Become mini-buildd user, and got to the new 1.0 reprepro repository you want to import to, and use the importer script to migrate packages:
# su - mini-buildd
$ cd repositories/REPOID
$ /usr/share/doc/mini-buildd/examples/import-08x ~/rep/squeeze-REPOID-experimental squeeze-REPOID-experimental
$ /usr/share/doc/mini-buildd/examples/import-08x ~/rep/squeeze-REPOID squeeze-REPOID-unstable
This example is for squeeze; repeat the imports for all base distributions you want to migrate.
Thusly, ye olde *-experimental distribution will be migrated to the distribution with the same name in 1.0. Ye olde ‘squeeze-REPOID’ goes to squeeze-REPOID-unstable. For the latter, multiple package version will be automatically installed to rollback distributions.
(Optional) Fix up package status.
All the migrated packages are now in 1.0 “unstable” distribution; you may think of bulk-migrating them all to “stable”, if that were your semantics for the 0.8.x non-experimental distributions.
Eventually, when everything is updated, you may of course (re)move the old 0.8.x directory ~/rep/.
References:
| [1] | http://bugs.debian.org/cgi-bin/bugreport.cgi?bug=728096 |
| [2] | http://bugs.debian.org/cgi-bin/bugreport.cgi?bug=683205 |
| [3] | http://bugs.debian.org/cgi-bin/bugreport.cgi?bug=642031 |
| [4] | http://bugs.debian.org/cgi-bin/bugreport.cgi?bug=706086 |
| [5] | http://bugs.debian.org/cgi-bin/bugreport.cgi?bug=705238 |
| [6] | http://bugs.debian.org/cgi-bin/bugreport.cgi?bug=733281 |